Thursday, June 15, 2023

Azure landing zones

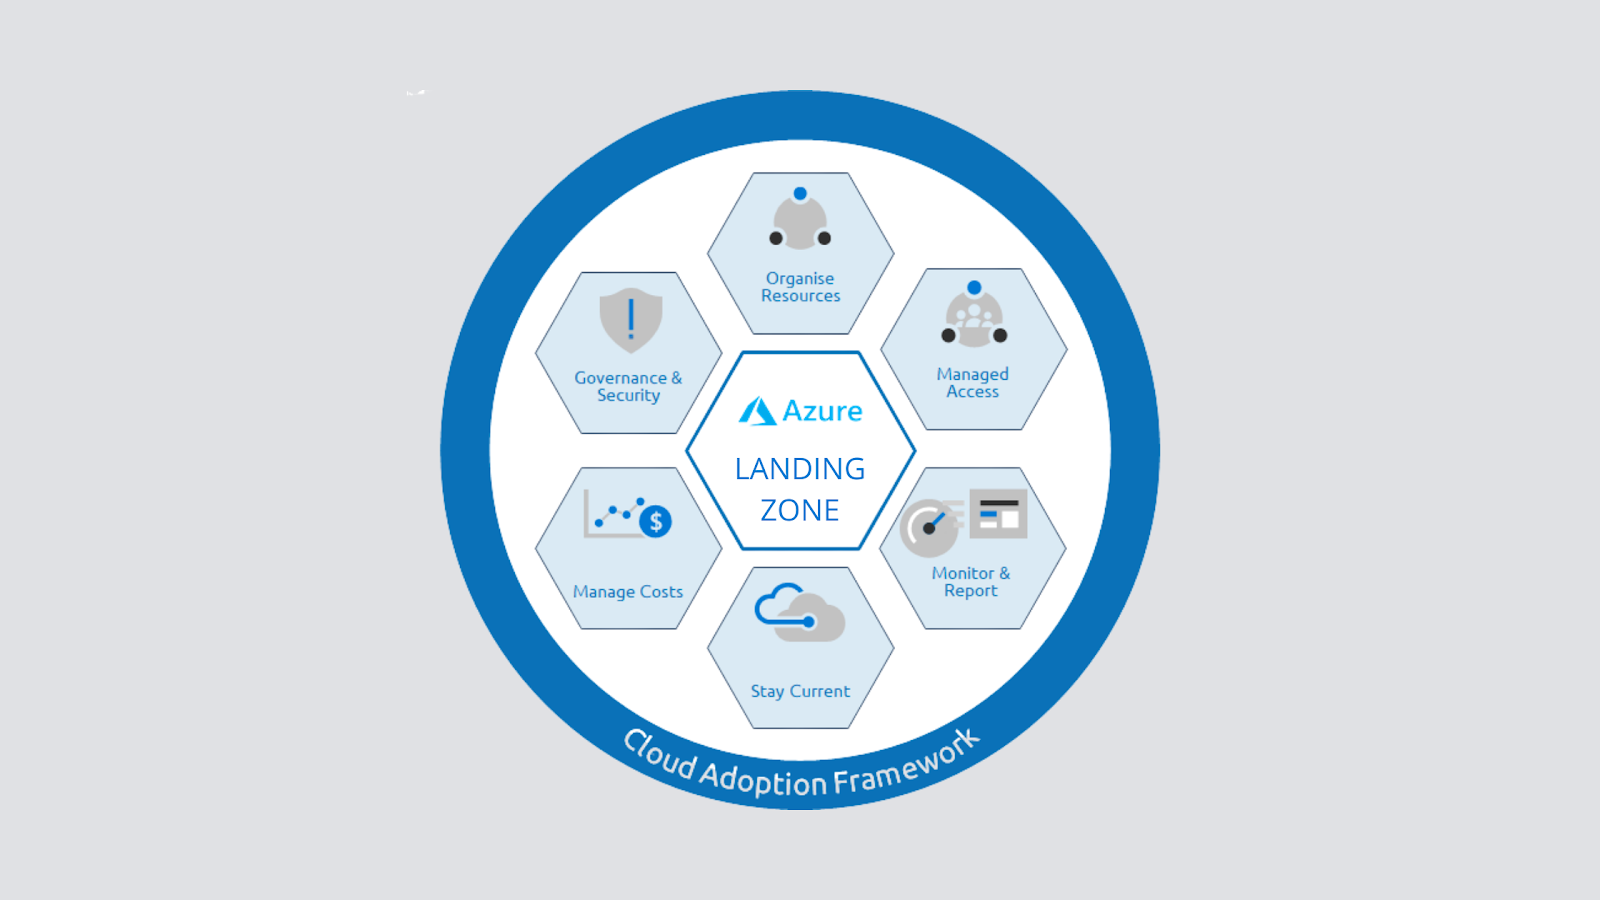
 Azure landing zones are a vast topic that we could write a book on in terms of their design, implementation, and how they are assessed. In simple terms, an Azure landing zone talks about subscription democratization, where we have multiple subscriptions meant for different types of workloads. Following this architecture will help you build an architecture that is responsible for scalability, security, governance, compliance, networking, and identity.

There are two types of landing zones:

•  Platform landing zones: A central team for several central teams is split by functions, such as networking, identity, and others. It will deploy subscriptions to deliver unified services. These subscriptions are used for various applications and workloads. Platform landing zones are usually used to consolidate certain essential services for better efficiency and ease of operations. Examples of these essential services include networking components (ExpressRoute, VPNs, firewalls, NVA, Bastion, and so on), identity (domain controllers, Azure Active Directory Domain Controllers, and so on), and management services (Automation Accounts, Log Analytics workspaces, Dashboards, Azure Monitor, and others).

•  Application landing zones: Unlike platform landing zones, in an application landing zone, we leverage management groups to segregate workloads. Here, we deploy one or more subscriptions for a workload or application. These will be placed under different management groups such as Online, Corp, SAP, and others. These management groups will be placed under a parent management group called Landing zone. This hierarchy helps us assign separate policies and access controls for our workloads. Application landing zones have been further subcategorized. Refer to this link to read more: https://learn.microsoft.com/en-us/azure/cloud-adoption-framework/ready/landing-zone/#platform-vs- application-landing-zones.

Microsoft has provided a conceptual architecture that organizations can leverage for building their landing zone. Again, this is conceptual and does not apply to all customers. Landing zone implementation can be customized as per your organizational requirements. Refer to https://learn.microsoft.com/en-us/azure/cloud-adoption-framework/ready/ landing-zone/tailoring-alz to understand how to create landing zones based on your requirements. Microsoft has developed this conceptual architecture based on customer feedback and field experiences, which is available at https://learn.microsoft.com/ en-us/azure/cloud-adoption-framework/ready/landing-zone/#azure- landing-zone-architecture.

If you feel that the conceptual architecture fits your organizational requirements, then you can use the Azure landing zone accelerator. With the help of well-defined templates from Microsoft, you can create the landing zone’s structure from the Azure portal. You can find the landing zone accelerator at https://learn.microsoft.com/en-us/azure/cloud-adop-tion-framework/ready/landing-zone/#azure-landing-zone-concep- tual-architecture.

Thant Zin Phyo@Cracky (MCT, MCE, MVP)

Monday, June 12, 2023

Multi-cloud capabilities in Microsoft Defender for Cloud

 As the new product name indicates, Microsoft Defender for Cloud is no longer an  Azure-focused security solution. It's rather a CSPM and CWPP for both, multi- and hybrid cloud environments. At Microsoft Ignite in November 2021, Microsoft announced its new API-based multi-cloud CSPM for AWS. As of now, you no longer need to enable AWS Security Hub in order to connect your resources to Defender for Cloud. By integrating AWS in the native Defender for Cloud experience, it is now very easy to connect your resources from there and get recommendations and visibility into their security posture in the same, unified experience. In addition, you can opt in to use Microsoft Defender for Servers and/or Defender for Containers on your AWS  resources, too.


Figure  – AWS connectors in Defender for Cloud's environment settings view

Once you have connected an AWS account to Defender for Cloud, assessments will start, based on the AWS CIS 1.2.0 and AWS Foundational Security Best Practices compliance standards. Recommendations for AWS resources will appear in the recommendations view, and they will also affect your secure score. You can even filter for recommendations that apply to your AWS resources by using the Environment filter in the recommendations view. Just make sure you select AWS (preview) only, as shown in Figure :


Figure – Filter for recommendations that apply to your AWS resources

For hybrid and multi-cloud machines (VMs, on-premises servers, and so on), Defender for Cloud leverages Azure Arc for making non-Azure resources Azure-like. Once  a machine has been onboarded to Azure Arc, Defender for Cloud can use Azure-native capabilities to install agents, manage settings, and much more besides. From a Defender for Cloud perspective, it makes no difference if the machine is natively running on Azure, or if it has just been connected. All agents that are used within the scope of Defender for Cloud can be installed as Arc extensions, and so Defender for Servers, Containers, and SQL on machines can treat these machines as if they were part of the Azure environment. 

Thant Zin Phyo@Cracky (MCT, MCE, MVP)

Saturday, June 10, 2023

Just-in-time VM access

 Just-in-time access for Azure VM is used to block inbound traffic to VMs until specific traffic is temporarily allowed. This reduces their exposure to attacks by narrowing down the surface and enabling access. Enabling Just In Time (JIT) will block inbound traffic on all ports that are usually used for management, such as RDP, SSH, or WinRM. The user must explicitly request access, which will be granted for a period of time, but only for a known IP address. This approach is the same as is used with Privileged Identity Management (PIM), where having rights doesn't necessarily mean that we can use them all the time; we have to activate/request for them to be used for a period of time.

Important Note : JIT access for Azure VMs supports only VMs deployed through Azure Resource Manager (ARM). It's not available for non-Azure VMs or legacy Azure VMs deployed through Azure Service Management (ASM).

JIT can be configured from the Defender for Cloud blade, or from the Azure VM blade. Configuring JIT for an Azure VM requires a few parameters to be defined, such as which ports we want to use, whether we want to allow access from a specific IP address or range in the Classless Inter-Domain Routing (CIDR) format, and the maximum period of time for which access will be available.

An example of configuring JIT is shown in the following screenshot:


Figure – Configuring JIT access

By default, you have the most common management ports available. You can edit rules for these ports, and delete or add custom rules. Besides ports, we can change protocols, the allowed source, and the maximum request time (this can be between 1 and 24 hours). Once JIT is configured, access needs to be requested each time we want to access the VM. This, again, can be done from the Defender for Cloud blade or the Azure VM blade. While you are requesting, you can ask for a specific (or more than one) port to be opened, state whether you want to enable access from your current IP address or from an IP range that's been pre-defined by an administrator, and finally, you need to define the time range. The time range depends on the configuration. By default, the time ranges from 1 to 3 hours, but can be configured for up to 24 hours.

Requesting JIT access is shown in the following screenshot:


Figure – Requesting JIT access

JIT uses NSGs to control traffic that is allowed or blocked. When JIT is configured for an Azure VM, NSG rules are created to block access over configured ports. Ports that are not configured for JIT should be automatically blocked unless configured otherwise. When JIT access is requested, another NSG is temporarily created that will allow access on the requested port. The new NSG rule will have a higher priority and override the block rule to enable access. Once the requested time period expires, the allow rule will be deleted, and access will be blocked again.

Important Note : If JIT is in use, no NSG rules for management ports should be created manually. Azure Security Center should control these ports at all times. If you create rules manually, you may override JIT rules, or you may create a rule that will allow one of the management ports at all times and use JIT for the rest of the management ports. Both situations render JIT pointless.

Thant Zin Phyo@Cracky (MCT, MCE, MVP)


Monday, June 5, 2023

Cloud Security Posture Management with Defender for Cloud

 As you learned in the previous section, Cloud Security Posture Management (CSPM) is one of the two main pillars in Microsoft Defender for Cloud. CSPM is all about hardening your cloud resources and that is why Defender for Cloud will provide you with a large list of security recommendations to help you understand what is good and what can be improved in your resources' configuration. Secure score is the main Key Performance Indicator (KPI) when it comes to understanding how good (or bad) you have configured your resources. The idea of secure score is to show a percentage value based on fixed points that are given for remediating recommendations that are grouped in security controls, as shown in Figure 1.1:


Figure 1.1 – Secure score, security controls, and recommendations

Figure 1.1 shows an environment with a secure score of 48%. The higher this percentage value is, the better protected your resources are. Secure score is calculated based on the following formula:
In the preceding example, the calculation is as follows:
The maximum score is a fixed number, depending on the security controls that apply to your environment. In Figure 1.1, you see two security controls (Enable MFA and Secure management ports), which have a maximum score of 10 and 8. While Defender for Cloud has more than 200 recommendations, not all of them might apply to your environment. For example, in case you don't have any VMs in your Azure subscription, you won't see the Secure management ports control, and therefore might have  a maximum secure score of only 50 instead of 58.

Tip : The maximum secure score when writing this book is 58 based on the maximum score of all 15 security controls. This number might change slightly when Microsoft is adjusting the maximum score per control, or when adding new controls.

In order to increase your secure score, you need to make sure to remediate all recommendations in a particular security control that apply to a single resource. Let's take a closer look at the Secure management ports control in Figure 1.2:


Figure 1.2 – Secure score calculation per resource

The total number of resources in this example is seven VMs, two of which need to remediate the Management ports should be closed on your virtual machines recommendation, and four of which need to remediate the last recommendation. For the whole control, you see that four out of seven resources are unhealthy, which means that three out of seven VMs in this control's scope are already completely remediated (and therefore count toward this environment's secure score). The maximum score per resource is the maximum score per control divided by the number of resources within a control, using this formula:
In our scenario, the per-resource score is as follows:

The current score is calculated as follows:

Using the numbers from our scenario, the current score is as follows:
That's why Figure 1.2 shows a current score of 3.43.

Now that you know how secure score is calculated.

Thant Zin Phyo@Cracky (MCT, MCE, MVP)

Sunday, May 28, 2023

Enabling Microsoft Defender for Cloud via Azure Policy

Azure Policy comes with a variety of built-in policy definitions, one of which is used to enable Microsoft Defender for Cloud on the scope you chose. In order to enable the service on all existing and future subscriptions, it's enough to simply assign the Enable Azure Security Center on your subscription policy to your root management group.  To onboard a management group and all its subscriptions to Defender for Cloud, follow these steps:

1.  Make sure to log in with an account that has Security Admin permissions, open Azure Policy, and search for the Enable Azure Security Center on your subscription policy definition. 


Figure 1.1 – Policy definition to enable Defender for Cloud

2.  Select the definition, and then click Assign:


Figure 1.2 – Assigning the policy definition

3.  Select Tenant Root Group as the assignment scope. There are no other parameters you need to change. 

Figure 1.3 – Assigning the policy definition to your Tenant Root Group

4.  Click Review + create and then Create.

5.  After the definition has been assigned, navigate to the Assignments blade in Azure Policy and select the assignment you have just created. In the assignment, click on Create Remediation Task. This remediation task is necessary to make sure Defender for Cloud will not only be enabled for future subscriptions, but also for all subscriptions that already exist.


Figure 1.4 – Create Remediation Task

6.  Select all applicable resources (if any) and click on Remediate.

Now that you have enabled Microsoft Defender for Cloud on all of your subscriptions, let's move on and deploy mandatory agents and extensions to your IaaS.

Thant Zin Phyo@Cracky (MCT, MCE, MVP)

Thursday, May 25, 2023

Understanding Azure Front Door

 Azure Front Door works very similarly to Application Gateway but on a different level. Like Application Gateway, it's an L-7 load balancer with an SSL offload. The difference is that Application Gateway works with services in a single region, whereas Azure Front Door allows us to define, manage, and monitor routing on a global level. With Azure Front Door, we can ensure the highest availability using global distribution. A similar thing can be achieved with Azure Traffic Manager (in terms of global distribution),  but this service lacks L-7 load balancing and SSL offloading.

What Azure Front Door provides actually combines Application Gateway and Traffic Manager to enable an L-7 load balancer with global distribution. It's also important to mention that a WAF is also available on Azure Front Door. Using a WAF on Azure Front Door, we can provide web application protection for globally distributed applications.


Thant Zin Phyo@Cracky (MCT, MCE, MVP)

Saturday, May 20, 2023

Hub-and-spoke network topology

For large and enterprise organizations, a hybrid cloud can become complex, and hard to manage and secure. With multiple VNets and hybrid cloud implementation, it can become difficult to monitor network traffic or even know the exact traffic flow. For complex network topologies, it is recommended to implement the hub-and-spoke model. In this model, we have a central point (hub) to which all on-premises connections and VNets (spokes) are connected. This way, traffic is easy to monitor, inspect, and manage.

There are two possible implementations for the hub-and-spoke topology in Azure.

Hub VNet

Hub VNet implementation has a single VNet and a central network where everything else is connected:


Figure – Hub virtual network

All other networks (spokes) are connected to the hub VNet. On-premises networks are connected over VPN Gateway (or ExpressRoute) and VNets are connected with peering. A hub network can come with other network resources, such as Azure Firewall, Azure Bastion, and Azure DDoS Protection. All traffic needs to go through the hub network and it enables us to easily manage network traffic and monitor  it in a central location.

Let's say we need to connect from an on-premises network to one of the VNets in Azure. The on-premises network is connected to the hub over VPN, and the VNet is connected to the hub over peering. If traffic needs to go from one network to another, it needs to go through the hub network. Using the hub network, we can define what types of traffic are allowed as well as monitor and inspect network packages.

A similar process can be applied when only VNets are in place. All VNets are only connected to hub networks over peering. If traffic needs to go from one network to another, it needs to go through the hub network.

Azure Virtual WAN is an alternative to the previous design, replacing the hub VNet with a managed service. All on-premises and VNets are still connected to the hub, but instead of managing hub networks ourselves, we have a managed service in place. Besides not managing hub networks, another benefit of this design is easier connectivity of networks across regions. Under Azure Virtual WAN, we can have multiple hubs in different regions for connecting VNets in the corresponding region. Communication between regions is done over a connection between hubs (over the  Azure backbone network). All hubs are still managed in a central location, in Azure Virtual WAN.

Let's move on to networking in PaaS and see what else is available, besides securing PaaS with service endpoints. We can have better network control and prevent unwanted traffic even with publicly available endpoints. 

Thant Zin Phyo@Cracky (MCT, MCE, MVP)

Thursday, May 18, 2023

Azure Bastion

When running IaaS, exposing management ports such as RDP (port 3389) or SSH  (port 22) is not a good idea. Bad actors are constantly scanning public networks in  the search for exposed endpoints. If they detect such a port open, they will trigger  a brute-force attack in the hope of gaining access to a service. This is usually mitigated by creating a jump box, a VM that enables us to securely connect to it before connecting to other VMs on the network.

Azure Bastion is a service that provides the ability to connect to our VMs using the browser and Azure portal. Similar to a jump box, it provides a secure way to connect  to our virtual network. But unlike a jump box (which we need to maintain and update), Azure Bastion is a fully managed service. With Azure Bastion, we are able to securely access VMs over RDP/SSH from the Azure portal over TLS. 


Thant Zin Phyo@Cracky (MCT, MCE, MVP)

Monday, May 15, 2023

Azure DDoS protection

 Distributed Denial of Service (DDoS) is one of the most common cyber attacks. A DDoS attack attempts to overload system resources and make a system unavailable to legitimate users. An attack can target any endpoint that is publicly reachable through the internet. 

Azure DDoS protection comes in two different flavors: Basic and Standard. 

Every property in Azure is protected by DDoS Basic protection at no additional cost.  To protect customers and prevent impacts on other customers, Basic protection provides defense against network layer attacks with always-on traffic monitoring and real-time mitigation. It requires no additional configuration or any user action; it is a built-in service protecting all Azure services, both IaaS and PaaS.

The standard plan provides additional functionalities, including the following:

•  Guaranteed availability

•  Cost protection

•  Custom mitigation policies

•  Metrics and alerts

•  Mitigation reports and flow logs 

•  DDoS rapid response support

Azure DDoS Standard protection is a tenant-wide service protecting up to 100 public IP addresses by default, with an additional charge for each public IP address over 100. There is no need to deploy an instance in each subscription; one instance can protect all endpoints across tenants in multiple subscriptions.

However, the Standard plan comes in a bundle of 100 IP addresses by default and should be used only when multiple endpoints require protection. 


Azure DDoS Protection reference architectures

Thant Zin Phyo@Cracky (MCT, MCE, MVP)

Friday, May 12, 2023

Connecting on-premises networks with Azure

In most cases, we already have some sort of local infrastructure and want to use the cloud as a hybrid where we combine cloud and on-premises resources. In such cases, we need to think about how we are going to access VNet from our local network.

There are three options available:

• Point-to-Site connection (P2S) is usually used for management and/or end use connections. It enables you to create a connection from a single on-premises computer to Azure VNet. It has a secure connection, but not the most persistent one, and shouldn't be used for production purposes, only to perform management and maintenance tasks, or to access applications.

•  Site-to-Site connection (S2S) is a persistent connection that enables a network-to- network connection. In this case, that would be from an on-premises network to  a VNet, where all on-premises devices can connect to Azure resources and vice versa. Using S2S enables you to expend local infrastructure to Azure, use a hybrid cloud, and take advantage of the best things both on-premises and cloud networks can offer. 

•  ExpressRoute is a direct connection from a local data center to Azure. It doesn't go over the internet and offers a much better connection. Compared to an S2S connection, ExpressRoute offers more reliability and speed with lower  network latency.


Thant Zin Phyo@Cracky (MCT, MCE, MVP)

Wednesday, May 10, 2023

Introducing security defaults

Security defaults are a rather new capability that will enforce basic identity security mechanisms across an Azure AD. These capabilities will ensure that user and administrator accounts are better protected from common identity-related attacks, such as brute force, or password spray.

Security defaults are enabled by default on new Azure AD enrollments but might need to be manually enabled on existing ones. To manage security defaults, navigate to Azure Active Directory and click the Properties option in the left navigation pane. Then, click the Manage Security defaults link and switch the Enable Security defaults setting to Yes , as shown in Figure 1.1:


Figure 1.1 – Enable Security defaults

Security defaults will require all users and administrators to use MFA and block legacy authentication protocols. Once security defaults have been enabled, users will be asked to proceed through the MFA procedure you already know from the previous section.  However, the first screen that users are presented with will look slightly different, as shown  in Figure 1.2:


Figure 1.2 – Security defaults have been enabled

Besides the Use a different account option, or to proceed by clicking Next, there is a third option that will let users skip the MFA configuration for now. However, 14 days after the first sign-in event, every user is required to configure MFA, so this option will no longer be available as of then. The rest of the configuration is the same as you learned about in the MFA activation from a user's perspective section. Security defaults are a great and easy way to protect all accounts with the same setting across your Azure AD directory. Now that you know how to enable MFA, and how to configure the settings from a user's perspective, let's move one step further and learn how Conditional Access can be used to fine-tune the MFA process according to your company's business needs.

Thant Zin Phyo@Cracky (MCT, MCE, MVP)

Monday, May 1, 2023

MFA activation from a user's perspective

After enforcing MFA for Cracky, a new window will appear after his next successful login, telling him that his organization needs more information to protect his account, as shown in Figure 1.1:

Figure 1.1 – New message at the first login after enforcing MFA

Cracky now only has two options: Use a different account to log in or click Next to proceed through the MFA activation process. With that being said, you should inform your users before activating MFA to let them know what's going to happen and to reduce the number of support tickets required!

Let's look at what happens if Cracky decides to complete the process:
1. Cracky decides to proceed, so he clicks the Next button.
2. On the following screen, Cracky is asked to download the Microsoft Authenticator app to his smartphone. Once finished, he clicks Next.


Figure 1.2 – Downloading the Microsoft Authenticator app

3. The next screen gives Cracky a short intro into what's coming, and he presses Next again.


Figure 1.3 – Keep your account secure

4. Cracky is asked to use his authenticator app to scan the QR code. This will set up his account in the Microsoft Authenticator app on his phone.


Figure 1.4 – Scanning the QR code to set up the account in the Microsoft Authenticator app

5. After the account has been set up in the app, clicking on the Next button will trigger an MFA challenge in the app. Cracky approves the login attempt and the account has been set up successfully.


Figure 1.5 – Notification has successfully been approved

Now that you know how to configure MFA from an administrator's and a user's perspective, let's move one step further and take a look at security defaults in Azure AD.

Thant Zin Phyo@Cracky (MCT, MCE, MVP)

Tuesday, April 25, 2023

How to enable MFA in Azure AD

 From an administrator's perspective, MFA activation in Azure AD is straightforward:

1. In the Azure portal, navigate to Azure Active Directory and select the Users navigation pane. In the upper navigation pane, select Per-user MFA, as shown in Figure 1.1:


Figure 1.1 – MFA activation in the Azure portal

2. You will be redirected to a retro-style portal at the windowsazure.com domain, in which you can enable or disable MFA for single users or bulk-update them by selecting several accounts or using a CSV file in the users tab.

3. Before you enable MFA for all user accounts, first switch from the users tab to the service settings tab to configure some custom settings for your environment, as shown in Figure 1.2:


Figure 1.2 – Service settings for MFA

The first option is to allow or disallow users to create app passwords for legacy non-browser apps that do not support MFA. Outlook used to be such an application back in the days; however, nowadays, most applications should be able to authenticate with MFA.
You can also define trusted IPs for which you can skip MFA. So, for example,  if your users are authenticating from one of your corporate offices and you have defined your external IP range(s) here, you can define that MFA challenges are only triggered when someone wants to authenticate from outside your corporate buildings. You can also enable and disable single verification options if they do
not fit your company's needs. The last setting is to allow users to remember MFA for devices they (but not you as a company!) trust. If you enable that option, users are not prompted with an MFA challenge again for a given period of time (between 1 and 365 days) on a particular device.

4. Now, back to enabling user accounts for MFA on the users tab. When you click the Enable link on the right side after selecting one or several user accounts (see Figure 1.3), you are prompted to read the online deployment guide and then click on enable multifactor auth. That's all from an administrator's point of view. Pretty easy? Indeed.


Figure 1.3 – Enabling MFA for one or several user accounts

The MFA-activated user has to configure all individual settings after the next login attempt. Telephone numbers for the account are taken from the information that is already stored in Azure AD. However, the user can update these numbers in the wizard that appears after the next logon.

Thant Zin Phyo@Cracky (MCT, MCE, MVP)

Wednesday, April 19, 2023

Understanding MFA

There are few technical features that protect your accounts more than using MFA. With MFA, it is not enough to know a username and a password; you are also challenged to prove who you are using another authentication factor. With MFA, you generally need to be able to log in with the following:

• Something you are, such as your user account name or a biometric attribute

• Something you know, such as a password

• Something you have, such as an additional authentication factor (smartcard, smartphone app, or security key)

Given the fact that an MFA challenge is only triggered following a successful login attempt, it is still reliant on passphrases that are not easy to guess. In other words, if an MFA challenge is triggered, the respective username/password combination has already been successfully validated (refer to the following screenshot for reference):

Today, there are several options for using MFA in Azure AD:
• A push message from the Microsoft Authenticator smartphone app
• A one-time password (OTP) from the Microsoft Authenticator smartphone app
• A text message with an OTP sent to your mobile device
• A phone call to an authentication phone
• A security key or token
If you have set up MFA the right way, you can react to all situations with a combination of these options. If you do not have access to mobile data or Wi-Fi, you can use the OTP code from a text message or from your smartphone app. If you leave your smartphone at home, you can get a call to your office phone (or another authentication phone you defined during the configuration process).

Important Note : It's important to understand that you should not use your mobile phone number as your authentication phone for obvious reasons. If you lose your phone or leave it at home, few options will remain open to you.

Thant Zin Phyo@Cracky (MCT, MCE, MVP)

Thursday, April 6, 2023

Dictionary attacks and password protection in Microsoft Azure AD

Dictionary attacks, such as brute-force and password spray attacks, still find success every day. In a dictionary attack, attackers try combinations of usernames and well-known and often-used passwords against an authentication service. The brute-force attack is more noisy and easier to recognize. With brute force, an attacker will try lots of passwords for  a single user account, hoping that one of the attacks will be successful. In the backend, you will see lots of failed login attempts, so you can easily react to them. However, a password  spray attack is way more sensitive since an attacker will only use a small set of passwords against lots of user accounts. If the attacks are very slow and widely distributed, it is very hard to notice an attack. To avoid successful password spray and brute-force attacks in the cloud and, to be more precise, in Azure AD, there are some easy best practices:

• Encourage your users to use passphrases instead of passwords.

• Block passwords or patterns that should not be used in your environment.

Currently, you can use passwords or passphrases with up to 256 (!) characters in Azure AD. Even if you were only to use all 26 letters from the alphabet in uppercase and lowercase, this would mean (2 x 26) 256 possibilities, which results in a number near infinity.

With that said, and knowing that you cannot only use uppercase and lowercase letters but also numbers and other characters in a passphrase, this results in a plethora of combinations. You see that you should definitely enable and encourage your users to use passphrases with a lot of characters.

For passwords you do not want to allow in your organization, there is another option you can enable. By default, Microsoft does not allow you to use passwords or password patterns that can be found on password lists and that are known to be used in dictionary attacks. For example, a pattern that is not allowed is your username, or any part of it. In addition to that, it might make sense for your company to avoid passwords that are easily relatable to your enterprise. These could include well-known marketing phrases, corporate abbreviations, and so on. In Azure AD, there is an option to create a custom banned password list that can be used to either audit or enforce the usage of secure passwords.

You can even use this custom list to enable password protection for your on-premises

Windows Server AD by installing and enabling an on-premises agent.

The custom banned password list can contain up to 1,000 case-sensitive terms between  4 and 16 characters in length. One nice feature is the fact that character substitution such as e and 3 or o and 0 is considered.


In order to configure a custom banned password list, you need to navigate to Azure Active Directory | Security | Authentication methods | Password protection in the Azure portal, as shown in Figure. On that screen, you'll also find configuration options for the Custom smart lockout feature. As mentioned before, you might find an on-premises AD security policy forcing accounts to be locked after a given number of failed login attempts. This is kind of an on/off decision, and you can easily increment the lockout counter with the same password to force account lockouts. Remember that this is why you should disable such policies in your on-premises AD and monitor login attempts instead.

However, in Azure AD, smart lockout is the feature that combines the best of two worlds: letting users work without blocking them unnecessarily and preventing attackers from guessing your passwords at the same time. To achieve that goal, smart lockout comes with some interesting features:

• Users are not meant to be blocked from working. Smart lockout recognizes attack attempts and login attempts from valid users. Attack attempts are treated differentlso legitimate users are still able to work while attackers are blocked.

• Smart lockout stores the last three bad password hashes. Doing so, you cannot simply use the lockout counter to enforce DoS by using the same bad password several times.

• The default lockout threshold is 10 bad attempts with a lockout duration of 60 seconds. Smart lockout is always on for Azure AD; however, it does not guarantee that legitimate user accounts are never locked out. The service uses familiar versus unfamiliar locations to try to figure out whether a login attempt comes from a bad actor or a genuine user. However, there is still a probability that users will be blocked from logging in. And one important point is that the service does not necessarily protect you from highly sensitive password spray attacks. This is not because the service is bad but because those kinds of attacks can become really difficult to discover.

Imagine an attacker has a list of nine passwords and they use a widely spread network of bots to attack thousands of user accounts in one custom domain over a time frame of weeks. In that situation, there are some facts to realize:

• The number of login attempts per user account will not exceed the default threshold of 10.

• By using several widely spread host systems to run the attack, it is hard to discover whether a login attempt is valid or malicious. However, Microsoft will also take into account whether a login attempt comes from a known bad IP address or an unfamiliar location.

So, in this scenario, the service will probably not block an attacker. Of course, the nine passwords in the list need to be quite sophisticated to be accepted. However, there is still a probability of an attacker being successful at guessing your passwords.

Now that you know why passwords are not enough to protect your accounts, let's move  one step further and see how multi-factor authentication (MFA) can give an additional layer of security to your accounts.

Thant Zin Phyo@Cracky (MCT, MCE, MVP)