Sunday, June 30, 2024

Planning Vnet subnet segmentation

Planning Vnet subnet segmentation

To provide isolation within a Vnet, we can divide it into one or more subnets. Subnets are primarily used for workload segmentation (logical perimeters within a Vnet). Figure 1.8 shows an example of this. In the diagram, we have a Vnet with two subnets. Web services are deployed into their ownsubnet (Web tier Subnet) and data services are deployed into their own subnet (Data tier Subnet).

With this approach, we can use an Azure route table to control how traffic is routed between the subnets. We can also use a network security group (NSG) or a network virtual appliance (NVA ) to define allowed inbound/outbound traffic flow from/to the subnets (segments). The result of this is that if a part of our application stack is compromised, we are better placed to contain the impact of the security breach and mitigate the risk of lateral movement through the rest of our network. This is an important Zero Trust principle implementation.

Figure – Segmentation using subnets

How many subnets can Azure VNet have? It can have up to 3,000 subnets! Each subnet must have a unique IP address range that is within the defined IP address spaces of the Vnet (overlap is not allowed). For example, a Vnet with an IPv4 address space of 10.1.0.0/16 cannot have a subnet with an IP address range of 10.1.1.0/24 and another subnet with an address range of 10.1.1.0/25 as these ranges overlap with each other. Attempting to do so will result in the error message shown in Figure:

Figure – Subnets with overlapping addresses not allowed\

After defining the IP address range for a subnet, Azure reserves five IP addresses within each subnet that can’t be used! The first four IP addresses and the last IP address in an Azure subnet cannot be allocated to resources for the following reasons:
• x.x.x.<first address>: This is reserved for protocol conformance as the network address
• x.x.x. <second address>: This is reserved by Azure for the default gateway of the subnet
• x.x.x. <third address> and x.x.x. <fourth address>: This is reserved by
Azure to map the Azure DNS IPs to the Vnet space
• x.x.x. <last address>: This is reserved for protocol conformance as the broadcast
address (even though Azure Vnets don’t use broadcasts as we mentioned earlier)

For example, if the IP address range of your subnet is 10.1.0.0/24, the following addresses will be reserved:
• 10.1.0.0: Network address
• 10.1.0.1: Default gateway address
• 10.1.0.2 and 10.1.0.3: Used to map Azure DNS IPs to the Vnet space
• 10.1.0.255: Broadcast address

This leaves a total of 250 addresses that can be allocated to subnet resources: 10.1.0.4 – 10.1.0.254. Because of the required address reservation, the smallest supported IPv4 address prefix is /29, which gives five reserved addresses and three usable addresses. Specifying anything less leaves zero usable IPv4 addresses, which results in the error message shown in Figure:
Figure – The smallest supported IPv4 address prefix for a subnet is /29

If you are implementing a dual-stack design, the standard size of the assigned IPv6 address space should be /64. This is in line with the standard defined by the IETF. A /64 space is the smallest subnet that can be used locally if auto-configuration is desired. Any attempt to add an IPv6 address space that is not a /64 will result in the error message shown in Figure:
Figure – Only a /64 address space assignment allowed for a subnet

When planning your subnets, make sure that you design for scalability. Workloads in your subnets should not cover the entire address space, giving you no room to add more workloads if needed. Plan and reserve some address space for the future. Also, take into consideration that some network resources such as the VMSS may need to dynamically add more workloads based on incoming requests. Modifying the IP address range of an Azure subnet that has workloads deployed is no straightforward task. It involves you removing all existing resources! Attempting this will result in the error message shown in Figure:
Figure – The error message when trying to resize a subnet with resources

Thant Zin Phyo@Cracky (MCT, MCE, MVP)


Sunday, June 23, 2024

Planning Vnet naming

Planning Vnet naming

All Azure resources have a name that must be unique within a scope. The scope is different for each resource type. When creating a Vnet, its name must be unique within the scope of the resource group. This means that it is possible to have two Vnets in your Azure subscription with the same name as long as they don’t belong to the same resource group! This can be useful in a design that involves having the same Vnet resource name for both development and production environments, as shown in Figure.

Figure  – Vnet names must be unique for the resource group scope

Even though it is possible to have duplicate names within a subscription, it is not a recommended practice as it could later lead to confusion when investigating security incidents using logging information (we will cover network logging and monitoring later in this book). When investigating security incidents, it helps to be able to quickly identify affected resources and having a unique resource naming strategy for your Vnets helps with this.

Regarding naming best practices, it is best to define a naming convention as early as possible. This convention should be communicated to the teams with permission to create network resources in Azure, and preferably, the naming convention should be enforced using tools such as Azure Policy.

To define a good naming strategy, consider these recommendations:
  •  Review resource name restrictions for the Vnet and other network resources in Azure. For example,  a Vnet name can have up to 64 characters made up of alphanumerics, underscores, periods, and  hyphens. Your naming convention should take this into consideration. Information on Vnet naming restrictions can be found at https://docs.microsoft.com/en-us/azure/azureresource-manager/management/resource name-rules#microsoftnetwork.
  • Consider including information about the following – resource type, resource location, deployment environment, and workload type in your naming convention. For example, a Vnet for production web services workloads in the East US region might be named prodeastus-webservices-Vnet.
Figure  – Sample vNet naming convention

For more thoughts on naming conventions, please refer to this document: 
https://docs.microsoft.com/en-us/azure/cloud-adoption-framework/ready/azure-bestpractices/resourcenaming.

Thant Zin Phyo@Cracky (MCT, MCE, MVP)


Sunday, June 16, 2024

Planning VNet location

Planning VNet location

Almost all Azure services are created in a regional location specified at creation time. I said almost all because there are some exceptions – so-called global or non-regional services that are not pinned to a region. Azure Vnet is a regional service.

The Azure cloud has 55 active regions in which we can create Vnets (with nineteen announced regions coming soon).

So, which regions should you select when creating Vnets? Consider the following three points to guide your decision regarding this:

  •  Business compliance requirements: This is the first point that you should consider when deciding the Azure region to locate your Vnets in. If there are organizational/industry compliance requirements that require data residency or data sovereignty in a geographic area, then you must adhere to that! You don’t want to end up in a situation where your organization is fined or charged for violating governmental regulations! For example, if you are providing services to a US government agency, the workloads that you are using to provide those services may be required to be in Vnets created in one of the Azure US government regions.
  •  Proximity to the users: This is the second key point to consider regarding Vnet location. You want your networks in locations close to the end users to ensure the lowest network latency. For example, if your organization is based in the UK and your network will host workloads that will provide services to your customers in the area, it will probably be best to create your Vnet(s) in either the UK South or the UK West Azure regions. You could perform your own tests to determine latency information for your end users or you could leverage unofficial sites such as https://azurespeedtest.azurewebsites.net/ and https://cloudpingtest.com/azure.
  • Resiliency requirements: This is another key point to consider when deciding where you should create your Vnets. Does your resiliency architecture require you to be able to distribute your network workloads in multiple data centers within the same region? If it does, then you need to select one of the regions that allow you to use availability zones (AZs) – distinct groups of data centers in the same region. Not all Azure regions currently support this capability. At the time of writing, only 25 of the 55 active regions support AZs. I will recommend checking this document for an up-to-date list before you create your network resources – https://docs.microsoft.com/en-us/azure/availability-zones/az-overview.
The following diagram shows an example of a Vnet with AZs:

Figure  – A vNet with AZs
Also, keep in mind that the decision to distribute your network workloads in multiple AZs in a region results in an extra cost of 0.01 USD (0.008 GBP) per gigabyte of data transferred between AZs for both inbound and outbound traffic.


Wednesday, June 12, 2024

Enabling AWS Security Hub

AWS Security Hub can be enabled from the AWS Management Console. However, because Security Hub needs to have the AWS Config service enabled (and prefers to have it fully enabled, watching all resources), you will follow the following steps via CloudFormation in this walk-through as well – all via the Management Console:

1. Go to https://console.aws.amazon.com/securityhub/ to access the AWS Security Hub main page.

2. Click on the orange button labeled Go to Security Hub to start the process of enabling Security Hub.

3. You should be brought to a page labeled Enable AWS Security Hub. In the first section labeled Enable AWS Config, click on the Download button to download the CloudFormation script to quickly set up a full version of the AWS Config service for Security Hub. The file should be named EnableAWSConfig.yml.

4. In a new tab, go to https://console.aws.amazon.com/cloudformation/ to open the CloudFormation main page. Make sure that, at the top of the screen, you can see you are in the same region where you want to initiate your Security Hub instance. Click on the orange Create stack button.

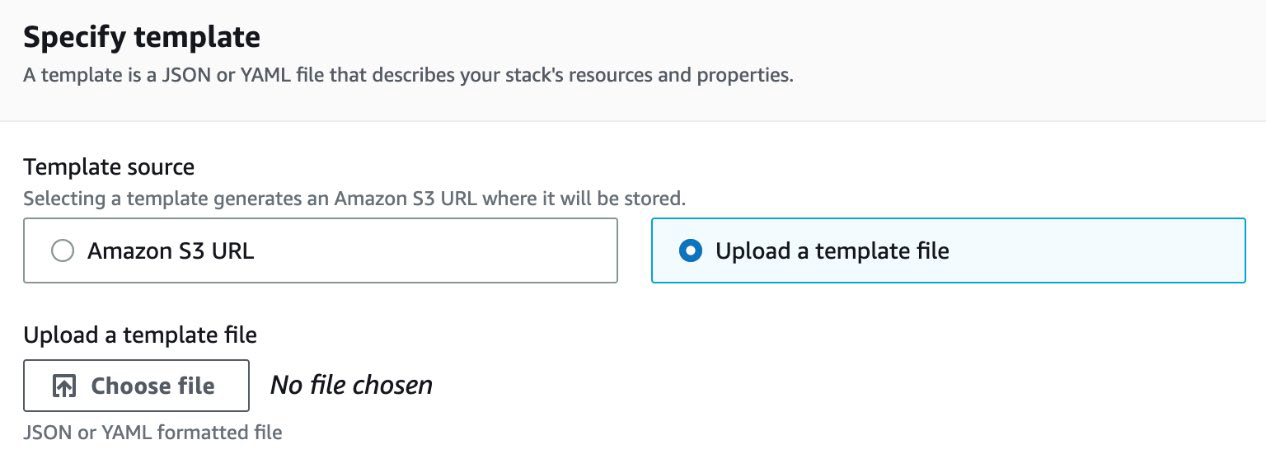
5. On the Create stack page, move to the second section, Specify template, and select the radio button labeled Upload a file. Then, click on the button marked Choose a file. Find the EnableAWSConfig.yml file you just downloaded, and then click Open.    


Figure : The template selection screen for Security Hub

6. Click the orange Next button at the bottom of the page.

7. You should now be on the Specify stack details page. Enter enable-config1 as the stack name (note that you cannot have a space in a CloudFormation stack name). Leave all other items as default, since the main interest is the Security Hub service with this exercise.
Scroll down to the bottom of the page and click on the orange Next button.

Figure : The stack name for Security Hub

8. On the Configure stack options page, scroll down to the bottom and click the orange Next button.

9. On Review Enable-Config, scroll down to the bottom of the page. Click on the blue checkbox acknowledging that this template might create IAM resources, and then click the final orange Submit button to create the stack.

Figure : The acknowledgement screen for Security Hub

10. Once the AWS Config Recorder is up and running, return to the tab where you set up the Security Hub service.

11. Now back on the Security Hub service, you can focus on the box labeled Security standards. These are the checks that you want the service to review and give notifications on where security posture is lacking. For this example, select to enable the following standards:
‚ AWS Foundational Security Best Practices v1.0.0
‚ CIS AWS Foundations Benchmark v1.4.0
‚ NIST Special Publication 800-53 Revision 5


Figure : The Security standards screen for Security Hub

12. At this point, click the Enable Security Hub button. When you initially enable Security Hub, you may see a warning message, stating that it could take up to two hours to see results from the newly enabled security checks.

After having set up the Security Hub, you are ready to take a closer look at the security standards and
security checks it presents.

Thant Zin Phyo@Cracky (MCT, MCE, MVP)

Understanding Azure VNet

Understanding Azure VNet

Before we get too far into Azure networking concepts, let’s establish what Azure VNet is and the capabilities that it provides.

A VNet is a virtual version of a physical network, implemented on the Azure cloud platform. The main advantage that it has over a traditional network is that we don’t need to implement or maintain the underlying physical hardware for this network (these responsibilities are offloaded to our cloud provider – Microsoft). But for the most part, we can achieve similar capabilities and architectures that we can achieve on-premises. We can even implement more flexible architectures with Azure VNets due to the software-defined nature.

So, what capabilities does Azure VNet provide? Here is a short list of some use cases:

• Connectivity for supported Azure services including VM, virtual machine scale sets (VMSSs), and 32 other services

• Native Internal TCP/UDP Load Balancing and proxy systems for Internal HTTP(S) Load Balancing

• Connects to on-premises networks using Cloud VPN tunnels and Cloud Interconnect attachments